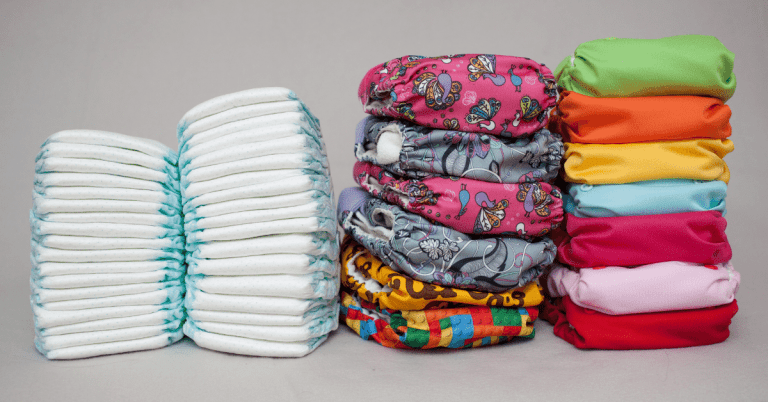
Folding Cloth Diapers
Easy Prefold Wrap:
Seriously easy. Folding cloth diapers is as easy as folding a hand towel!
1. Pull out one Prefold Diaper and one Cloth Diaper Cover. Lay your prefold flat in front of you so that the serged ends are on top and bottom.
 *You can fold the prefold directly atop the wrap! (for the purpose of this demonstration, we’ve set the wrap aside). If, however, you are folding the prefold atop the wrap, remember that you place the prefold atop the wrap with the serged edges showing at the top and bottom (length-wise).
2. From one side, fold in the right (or left) non-serged edge of the Prefold Diapers towards its middle (usually about 1/3 of the width).
3. Do the same thing again on the other side. Do you see that we are basically folding the diaper into a thick lengthwise panel? The easiest way to fold a Prefold lengthwise is to follow the “seam” of the stitching.


4. Then, place the tri-folded prefold atop the wrap and if necessary, fold under any of the additional prefold length to fit within the wrap and for additional absorption. If your baby is a boy, fold the additional length under in front where the obvious extra absorption will be needed. If your baby is a girl, fold the additional length under in back.
We recommend folding your Prefolds and wraps ahead of time to store for a quick grab at the diaper changing table, diaper bag, or wherever else you happen to need one…
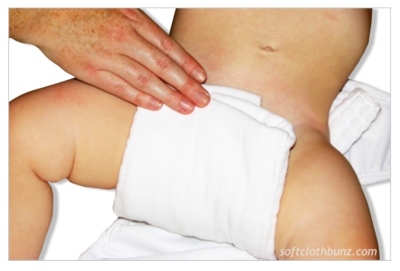
5. Lay baby atop the folded prefold so that the top serged edge is right at the baby’s back waistline, then bring the Prefold and Cover up between baby’s legs.


6. Finally, wrap the tabs found on the diaper cover’s back left and right “wings” around the baby to the front panel and secure.
We think the Easy Wrap is simply the easiest fold to do but you may want to try one of these other wraps to see what you prefer as well. Most people tend to find one fold they like and just stick to that but it is worth trying them all at least once to find the one that you like best.
Angel Wrap:
The Angel Fold provides full coverage to contain the messiest of baby’s diapers, while maintaining a comfortable fit.
*This cloth diaper fold can be used with a wool pull-on diaper cover also, but the ‘wings’ that wrap around baby’s waist from back to front may need to be secured with diaper pins or a diaper fastener to hold the prefold diaper in place.
1. Using one prefold diaper and one cloth diaper cover of your choice, lay your prefold diaper flat in front of you with serged ends at the top and bottom.
2. If folding into a wrap-style diaper cover, place the prefold diaper atop the diaper cover lengthwise. Again, ensure the serged edges are at the top and the bottom. Then, fold the bottom serged-edge of the prefold diaper up towards the top serged edge of the cloth diaper (about 1/3 the length of the prefold diaper). If using a cloth diaper doubler for extra absorption, lay it along the center panel of the prefold diaper lengthwise BEFORE folding the bottom serged-end of the prefold diaper up.
3. Next, you will create a ‘V’ shape with the prefold diaper by pulling the already folded bottom, left corner to the middle (center panel), and then repeating it again on the opposite side.

4. If using a stay dry liner, or a fleece topped diaper doubler, this is when you will put it in – lay it lengthwise atop the folded ‘V’. If you place it within the ‘V’ (as when you placed the diaper doubler), it will not be able to wick moisture away from baby’s skin as it will be underneath, not atop, the layered cotton ‘V’.
5. Lay baby atop the prefold diaper so that the top serged edge is horizontal to baby’s back waistline.
6. Bring the folded portion of the prefold diaper up between baby’s legs. At this time, you can adjust the rise (length from back waistline to front waistline) by letting out some of the fold in front.
Please note: Some of our customers have shared with us that they prefer wrapping the back wings around to the front and fastening them with diaper pins or a Snappi at this point. THIS IS NOT NECESSARY with a wrap-style diaper cover, but it certainly is another way to ensure the diaper stays snug around baby’s legs to add extra protection against leaks.
7. After the prefold diaper is adjusted for baby in the rise, bring the front of the cloth diaper wrap up between baby’s legs. The diaper cover should extend beyond the prefold at the waist to keep moisture from seeping out to the waistline of baby’s clothes.

8. Finally, secure the tabs by wrapping the diaper cover’s back left and right ‘wings’ around to the front velcro panel. Very simple. Very secure.

This cloth diaper fold is not just to be used with a wrap-style cloth diaper cover; it can be used with ANY diaper cover. Instead of starting by laying it within the wrap-style cover, start the cloth diaper fold on the diaper changing table and proceed. Then, once the diaper is fastened with diaper pins or a Snappi Diaper Fastener, pull-on or snap-on any style diaper cover you choose.
Basic Angel Wing Fold:
This fold can be used with any size of pre-fold diapers. It provides excellent absorbency and a trim fit. Waterproof diaper covers have replaced the need for pins and rubber pants. They are cool and breathable. Snappis are another new addition making cloth diapering that much easier. They work like pins, but are much safer.
 1. Fold a small portion of the diaper up on one end. |  2. Fold the sides of the diaper in on themselves over the center panel to form a pad. |
 3. Unfold the sides at the top a bit to form ‘wings’. |  4. Place folded diaper pad in center of diaper cover. |
 5. Place the diaper cover and absorbent pad under baby. Bring the front of the cover up between babies legs. | 6. Close around baby and fasten for a perfect fit. After fastening, check to be sure that all of the diaper is tucked within the waterproof cover to ensure wicking onto babies clothes does not occur. |
The Bikini Twist:
If your baby has heavy thighs, this fold works wonders. It provides a high cut opening while maintaining superior absorbency. This fold works best with diapers on the large size for your baby or when your baby is on the low end of the size chart for each size of prefold. Below shows a the diaper fastened with pins, but Snappis are by far the simplest and most effective way to secure the diaper in this fold.
1. Start with a infant, baby, or toddler sized prefold diaper. |  2. Flip one end of the diaper completely over forming a twist in the middle. |
 3. Place the diaper under baby and bring the front corners (B & C) up through baby’s legs. |  4. Wrap the front corners (B & C) around baby’s sides and bring the back corners to the front (A & D). |
 5. Fasten the back corners (A & D) with pins or Snappis the the front of the diaper. | 6. Wrap the diapered baby with a snug waterproof cover. Be sure that the diaper is entirely encased by the cover. |
Flat Diaper Folding:
For those true pioneers…using flat diapers consists of a series of folds that form small triangular pads. We recommend fastening with pins or snappis when using flat diapers.
 1. Fold square flat diaper in half to form a triangle. Repeat this fold to form a smaller triangle. Repeat as many times as needed to form a triangle in a size appropriate for your baby. |  2. Place diaper under baby with the long flat portion of the triangle resting under baby’s back. Bring the diaper up through baby’s legs and fasten. Wrap snugly with a waterproof diaper cover. |
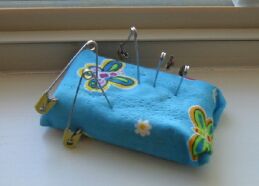
If you are using diaper pins- another little tip I heard is to cover a bar of soap with a pretty piece of fabric and use it as a pincushion for your diaper pins. This keeps them handy and the soap ensures that the pins slide easily through the diapers.